uvm driver介绍

本篇主要介绍uvm环境中的driver。

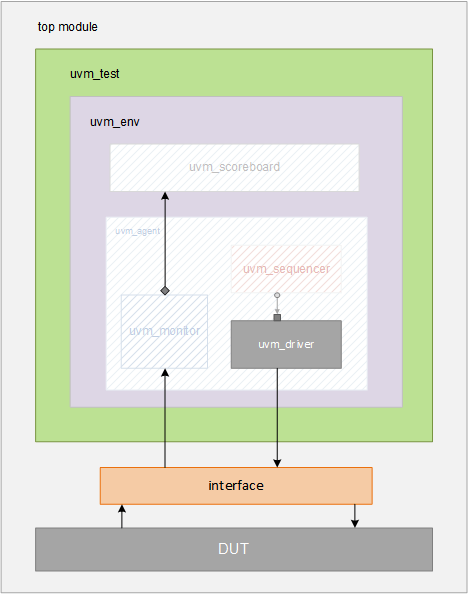
driver的主要作用是从squencer获取transaction, 然后驱动DUT的interface。如下图所示:

Driver的编写

  1. 从uvm_driver派生出自定义的class, 比如说是my_driver, 然后用factory机制注册, 并且创建 “new” 函数, 如下面代码所示
1
2
3
4
5
6
7
8
9
10
// my_driver is user-given name for this class that has been derived from "uvm_driver"
class my_driver extends uvm_driver;
// [Recommended] Makes this driver more re-usable
`uvm_component_utils (my_driver)
// This is standard code for all components
function new (string name = "my_driver", uvm_component parent = null);
super.new (name, parent);
endfunction
// Code for rest of the steps come here
endclass
  1. 申明 vitual interface, 并在build_phase获取配置:
1
2
3
4
5
6
7
8
9
  // Actual interface object is later obtained by doing a get() call on uvm_config_db
virtual if_name vif;

virtual function void build_phase (uvm_phase phase);
super.build_phase (phase);
if (! uvm_config_db #(virtual if_name) :: get (this, "", "vif", vif)) begin
`uvm_fatal (get_type_name (), "Didn't get handle to virtual interface if_name")
end
endfunction
  1. 编写run_phase
1
2
3
4
5
6
virtual task run_phase (uvm_phase phase);
// Loop the following steps
// 1. Get next item from the sequencer
// 2. Assign data from the received item into DUT interface
// 3. Finish driving transaction
endtask

Driver-Sequencer 通信

Driver 可以使用TLM端口和sequencer进行通信, 比如uvm_seq_pull_port。driver 可以向squencer请求transaction, 也可以在完成驱动后,进行回应(reponse)。

那么如何使用API呢?

  1. 在agent或者是env中将sequencer和driver的TLM 端口相连:
1
2
3
virtual function void connect_phase ();
m_drv0.seq_item_port.connect (m_seqr0.seq_item_export);
endfunction
  1. 使用握手的方式:get_next_item后面跟item_done();
1
2
3
4
5
6
7
8
9
10
11
12
13
14
15
virtual task run_phase (uvm_phase phase);
my_data req_item;

forever begin
// 1. Get next item from the sequencer
seq_item_port.get_next_item (req_item);

// 2. Drive signals to the interface
@(posedge vif.clk);
vif.en <= 1;
// Drive remaining signals, put write data/get read data

// 3. Tell the sequence that driver has finished current item
seq_item_port.item_done();
end

或者是使用下面的方式:

1
2
3
4
5
6
7
8
9
10
11
12
13
14
15
16
virtual task run_phase (uvm_phase phase);
my_data req_item;

forever begin
// 1. finish_item in sequence is unblocked
seq_item_port.get (req_item);

// 2. Drive signals to the interface
@(posedge vif.clk);
vif.en = 1;
// Drive remaining signals

// 3. Finish item
seq_item_port.put (rsp_item);
end
endtask

示例

下面是一个uvm driver的例子:

1
2
3
4
5
6
7
8
9
10
11
12
13
14
15
16
17
18
19
20
21
22
23
24
25
26
27
28
29
30
class my_driver extends uvm_driver #(my_data);
`uvm_component_utils (my_driver)

virtual dut_if vif;

function new (string name, uvm_component parent);
super.new (name, parent);
endfunction

virtual function void build_phase (uvm_phase phase);
super.build_phase (phase);
if (! uvm_config_db #(virtual dut_if) :: get (this, "", "vif", vif)) begin
`uvm_fatal (get_type_name (), "Didn't get handle to virtual interface dut_if")
end
endfunction

task run_phase (uvm_phase phase);
super.run_phase (phase);
forever begin
`uvm_info (get_type_name (), $sformatf ("Waiting for data from sequencer"), UVM_MEDIUM)
seq_item_port.get_next_item (data_obj);
drive_item (data_obj);
seq_item_port.item_done ();
end
endtask

virtual task drive_item (my_data data_obj);
// Drive based on bus protocol
endtask
endclass

参考

本文的图片和code来源于:

http://www.chipverify.com/uvm/driver